
Configure CI/CD on Astro Private Cloud
Configure CI/CD on Astro Private Cloud

Configure CI/CD on Astro Private Cloud
Deploy Airflow images and Dags to Astro Private Cloud using CI/CD pipelines. This guide covers deployment options via CLI, API, and common CI/CD platforms.
Deploying Dags and other changes via CI/CD workflows provides:
Astro Private Cloud supports multiple deployment methods. The Astro CLI approach is recommended for most use cases due to its simplicity.
The Astro CLI provides the simplest way to deploy to Astro Private Cloud from CI/CD pipelines.
Build and deploy an image:
Deploy Dags only:
Deploy a pre-built image:
The following optional flags are available for astro deploy:
--dags: Deploy only your dags folder. Works only if Dag-only deploys are enabled for the Deployment.--image-name <custom-image>: The name of a pre-built custom Docker image to use with your project. The image must be available on your local machine. If specified, building the image is skipped.--remote: Directly point the Deployment to the remote image and skip pushing the image. Use with --image-name.--runtime-version <version>: Specify the Runtime version of your image. Use with --image-name.--force: Force deploy even if your project contains errors or uncommitted changes. Use with caution in CI/CD pipelines, as it bypasses the safeguard that ensures only committed code is deployed.--description "<text>": Attach a description to a code deploy for traceability. If not provided, the system automatically assigns a default description based on deploy type.For advanced automation scenarios, you can use the APC APIs upsertDeployment mutation to deploy a pre-built image to a Deployment. This approach is useful when you need to integrate with systems that can’t use the Astro CLI directly.
The mutation accepts the following fields:
releaseName: The release name of your Deployment, following the pattern spaceyword-spaceyword-4digits. For example, infrared-photon-7780.image: The full image path including registry, repository, and tag. The image must be accessible from your Astro Private Cloud data plane.runtimeVersion: The Astro Runtime version that the image is based on. For example, 12.1.0.deployRevisionDescription: An optional description for the deploy revision, useful for tracking deploys in the APC UI.To explore the full APC API schema and test mutations interactively, use the GraphQL playground. For more information about deploying custom images with the APC API, see Configure a custom image registry.
The following examples show how to implement CI/CD pipelines using the Astro CLI with popular CI/CD platforms. For advanced Docker registry-based deployment examples, see Advanced: Docker registry deployment.
Consider an Astro project hosted on GitHub and deployed to Astro Private Cloud. In this scenario, dev and main branches of an Astro project are hosted on a single GitHub repository, and dev and prod Airflow Deployments are hosted on an Astronomer Workspace.
Using CI/CD, you can automatically deploy Dags to your Airflow Deployment by pushing or merging code to a corresponding branch in GitHub. The general setup:
dev and one for prod.dev branch off of your main branch.dev Airflow Deployment whenever you push to your dev branch, and to deploy to your prod Airflow Deployment whenever you merge your dev branch into main.That would look something like this:
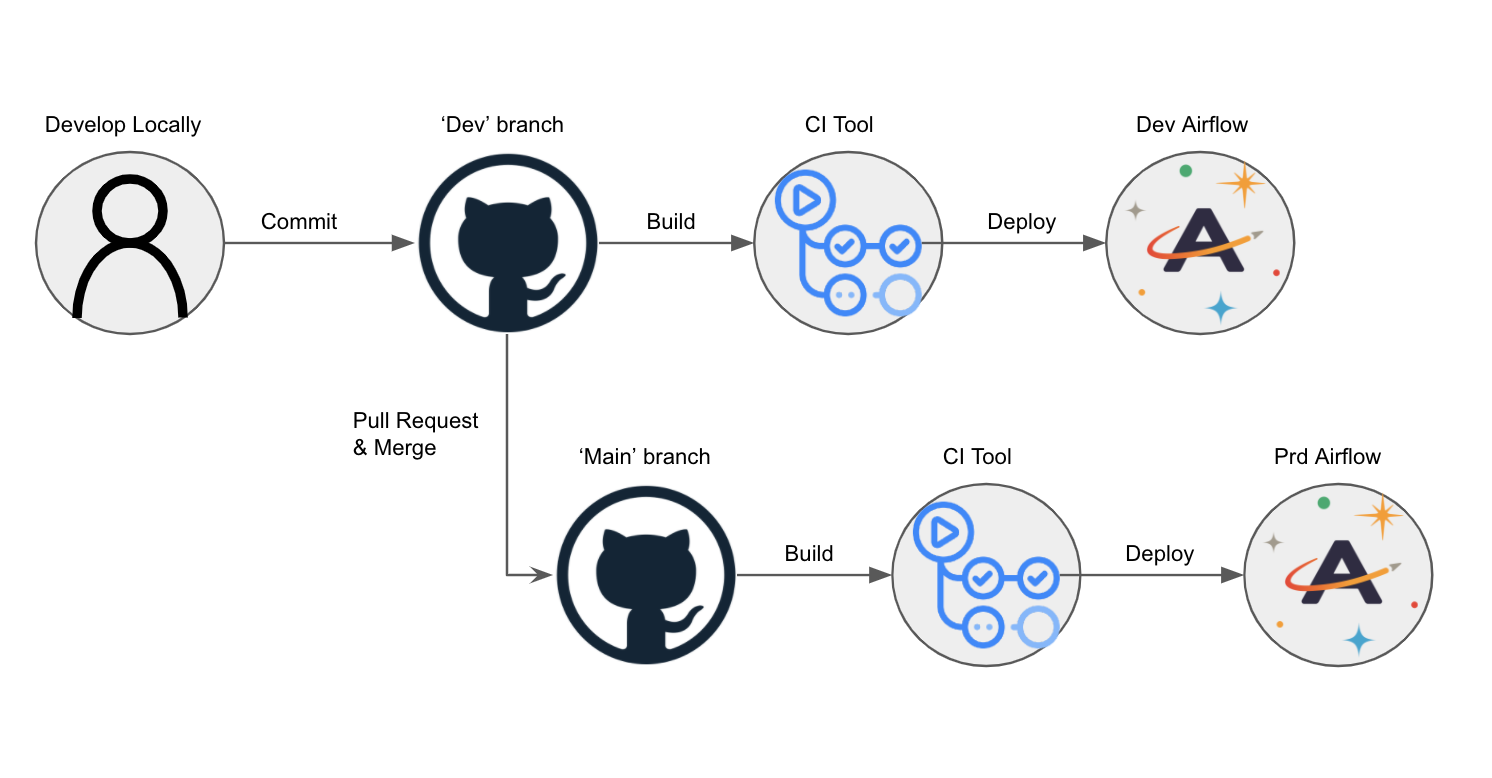
Service accounts provide secure, non-interactive authentication for CI/CD pipelines without requiring user credentials.
Before completing this setup, ensure you:
To authenticate your CI/CD pipeline to the Astronomer private Docker registry, create a service account and grant it an appropriate set of permissions. You can do so using the Astro Private Cloud UI or CLI. After creation, you can delete this service account at any time. In both cases, creating a service account generates an API key for the CI/CD process.
You can create service accounts at the:
Deployment level service account:
First, get your Deployment ID:
This outputs the list of running Deployments you have access to and their corresponding UUIDs.
With that UUID, run:
Workspace level service account:
First, get your Workspace ID:
Then create the service account:
You can also create a service account using the GraphQL API. The deploymentUuid field is the same Deployment ID (UUID) returned by astro deployment list.
Set in CI/CD environment:
If you prefer to provision a service account through the Astro Private Cloud UI:
Deployment > Service AccountsAfter creating a service account, set the credentials in your CI/CD environment:
The Astro CLI automatically uses these environment variables for authentication.
--force unless you have a specific reason to bypass the git commit check.--description for audit trail and version tracking.For advanced use cases, legacy systems, or when you need more control over the Docker build and push process, you can deploy directly to the Astronomer Docker registry. Most users should use the CLI deployment method instead.
When to use Docker registry deployment:
--provenance=false flag to your docker buildx build commands.RELEASE_NAME (for example, infrared-photon-7780) instead of DEPLOYMENT_ID. Both refer to your Astro Deployment, but the Astro CLI uses DEPLOYMENT_ID while the Docker registry approach uses the release name.The first step of this pipeline authenticates against the Docker registry that stores an individual Docker image for every code push or configuration change:
In this example:
BASE_DOMAIN = The domain at which your Astro Private Cloud instance is runningAPI_KEY_SECRET = The API key that you got from the CLI or the UI and stored in your secret managerAfter you are authenticated, you can build, tag, and push your Airflow image to the private registry, where a webhook triggers an update to your Astro Deployment.
FROM statement of your project’s Dockerfile must be the same as or newer than the Runtime version of your Astro Deployment. For more information on upgrading, see Upgrade Airflow.Image naming components:
registry.${BASE_DOMAIN}.spaceyword-spaceyword-4digits (for example, infrared-photon-7780).deploy-n, with n representing the number of deploys. For CI/CD, customize this tag to include the source and build number.Example with custom tag:
For CI/CD pipelines that push code to a production Deployment, Astronomer recommends adding a unit test after the image build step to ensure that you don’t push a Docker image with breaking changes. To run a basic unit test, add a step in your CI/CD pipeline that executes docker run and then runs pytest tests in a container based on your newly built image before it’s pushed to your registry. For guidance on writing pytest tests for Airflow, including Dag validation tests and unit tests for custom operators, see Test Airflow Dags.
For example, you can add the following command as a step in your CI/CD pipeline:
BASE_DOMAIN, RELEASE_NAME, and BUILD_NUMBER should be set as environment variables in your CI/CD tool.Depending on your CI/CD tool, configuration varies slightly. This section focuses on outlining what needs to be accomplished, not the specifics of how.
At its core, your CI/CD pipeline first authenticates to the Astronomer private registry, then builds, tags, and pushes your Docker image to that registry.
This example shows how to implement CI/CD using GitHub Actions with Docker registry deployment for both development and production environments.
Setup steps:
Create a GitHub repository for your Astro project with dev and main branches.
Create two Deployment-level service accounts: one for Dev and one for Production.
Add service accounts as GitHub secrets named SERVICE_ACCOUNT_KEY and SERVICE_ACCOUNT_KEY_DEV.
Create a GitHub Action with the following workflow:
Replace <dev-release-name> and <prod-release-name> with your Deployment release names.
dev to update your development Deployment, then merge dev into main via pull request to update production.The prod-push action only runs after merging a pull request. To further restrict this pipeline, add branch protection settings in GitHub to prevent direct pushes to main.
The following sections provide templates for configuring CI/CD pipelines using popular CI/CD tools with Docker registry deployment. Each template can be customized to manage multiple branches or Deployments based on your needs.
If you are using Bitbucket, this script should work (courtesy of our friends at Das42)
This example shows how to automatically deploy your Astro project from a GitHub repository using an Azure DevOps pipeline.
Prerequisites:
Setup steps:
Create a file called astro-devops-cicd.yaml in your Astro project repository:
Follow the steps in Azure documentation to link your GitHub repository to an Azure pipeline. When prompted for the source code for your pipeline, specify that you have an existing Azure Pipelines YAML file and provide the file path: astro-devops-cicd.yaml.
Finish and save your Azure pipeline setup.
In Azure, add environment variables for the following values:
BASE-DOMAIN: Your base domain for Astro Private CloudRELEASE-NAME: The release name for your DeploymentSVC-ACCT-KEY: The service account key you created for CI/CD (mark as secret)After completing this setup, any merges to the main branch of your GitHub repository trigger the pipeline and deploy your changes to Astro Private Cloud.