Deploy Dags

Configure CI/CD on Astro Private Cloud

Deploy Airflow images and Dags to Astro Private Cloud using CI/CD pipelines. This guide covers deployment options via CLI, API, and common CI/CD platforms.

Benefits of CI/CD for Airflow deployments

Deploying Dags and other changes via CI/CD workflows provides:

  • Streamlined development: Deploy new and updated Dags efficiently across team members.
  • Faster error response: Decrease maintenance costs and respond quickly to failures.
  • Improved code quality: Enforce continuous automated testing to protect production Dags.

Deployment methods

Astro Private Cloud supports multiple deployment methods. The Astro CLI approach is recommended for most use cases due to its simplicity.

CLI deployment

The Astro CLI provides the simplest way to deploy to Astro Private Cloud from CI/CD pipelines.

Build and deploy an image:

$astro deploy <DEPLOYMENT-ID>

Deploy Dags only:

$astro deploy <DEPLOYMENT-ID> --dags

Deploy a pre-built image:

$astro deploy <DEPLOYMENT-ID> \
> --image-name quay.io/myorg/airflow:v1.2.3 \
> --remote \
> --runtime-version 12.1.0

The following optional flags are available for astro deploy:

  • --dags: Deploy only your dags folder. Works only if dag-only deploys are enabled for the Deployment.
  • --image-name <custom-image>: The name of a pre-built custom Docker image to use with your project. The image must be available on your local machine. If specified, building the image is skipped.
  • --remote: Directly point the Deployment to the remote image and skip pushing the image. Use with --image-name.
  • --runtime-version <version>: Specify the Runtime version of your image. Use with --image-name.
  • --force: Force deploy even if your project contains errors or uncommitted changes. Use with caution in CI/CD pipelines, as it bypasses the safeguard that ensures only committed code is deployed.
  • --description "<text>": Attach a description to a code deploy for traceability. If not provided, the system automatically assigns a default description based on deploy type.

API deployment

For advanced automation scenarios, you can use the Houston API’s upsertDeployment mutation to deploy a pre-built image to a Deployment. This approach is useful when you need to integrate with systems that can’t use the Astro CLI directly.

1mutation {
2 upsertDeployment(
3 releaseName: "my-deployment"
4 image: "quay.io/myorg/airflow:v1.2.3"
5 runtimeVersion: "12.1.0"
6 deployRevisionDescription: "CI/CD Pipeline Deploy"
7 ) {
8 id
9 status
10 }
11}

The mutation accepts the following fields:

  • releaseName: The release name of your Deployment, following the pattern spaceyword-spaceyword-4digits. For example, infrared-photon-7780.
  • image: The full image path including registry, repository, and tag. The image must be accessible from your Astro Private Cloud data plane.
  • runtimeVersion: The Astro Runtime version that the image is based on. For example, 12.1.0.
  • deployRevisionDescription: An optional description for the deploy revision, useful for tracking deploys in the Astro Private Cloud UI.

To explore the full Houston API schema and test mutations interactively, use the GraphQL playground. For more information about deploying custom images with the Houston API, see Configure a custom image registry.

CI/CD platform examples

The following examples show how to implement CI/CD pipelines using the Astro CLI with popular CI/CD platforms. For advanced Docker registry-based deployment examples, see Advanced: Docker registry deployment.

GitHub Actions

1name: Deploy to Astro Private Cloud
2
3on:
4 push:
5 branches: [main]
6
7jobs:
8 deploy:
9 runs-on: ubuntu-latest
10 steps:
11 - uses: actions/checkout@v4
12
13 - name: Install Astro CLI
14 run: curl -sSL https://install.astronomer.io | sudo bash -s
15
16 - name: Authenticate
17 run: astro auth login <platform-domain> --token-login
18 env:
19 ASTRONOMER_KEY_ID: ${{ secrets.ASTRONOMER_KEY_ID }}
20 ASTRONOMER_KEY_SECRET: ${{ secrets.ASTRONOMER_KEY_SECRET }}
21
22 - name: Deploy
23 run: astro deploy ${{ vars.DEPLOYMENT_ID }}

GitLab CI

1deploy-airflow:
2 stage: deploy
3 image: ubuntu:latest
4 script:
5 - curl -sSL https://install.astronomer.io | bash -s
6 - astro auth login ${PLATFORM_DOMAIN} --token-login
7 - astro deploy ${DEPLOYMENT_ID}
8 variables:
9 ASTRONOMER_KEY_ID: ${ASTRONOMER_KEY_ID}
10 ASTRONOMER_KEY_SECRET: ${ASTRONOMER_KEY_SECRET}
11 only:
12 - main

CircleCI

1version: 2.1
2
3jobs:
4 deploy:
5 docker:
6 - image: cimg/base:current
7 steps:
8 - checkout
9 - run:
10 name: Install and Deploy
11 command: |
12 curl -sSL https://install.astronomer.io | sudo bash -s
13 astro auth login ${PLATFORM_DOMAIN} --token-login
14 astro deploy ${DEPLOYMENT_ID}
15
16workflows:
17 deploy-workflow:
18 jobs:
19 - deploy:
20 filters:
21 branches:
22 only: main

Example CI/CD workflow

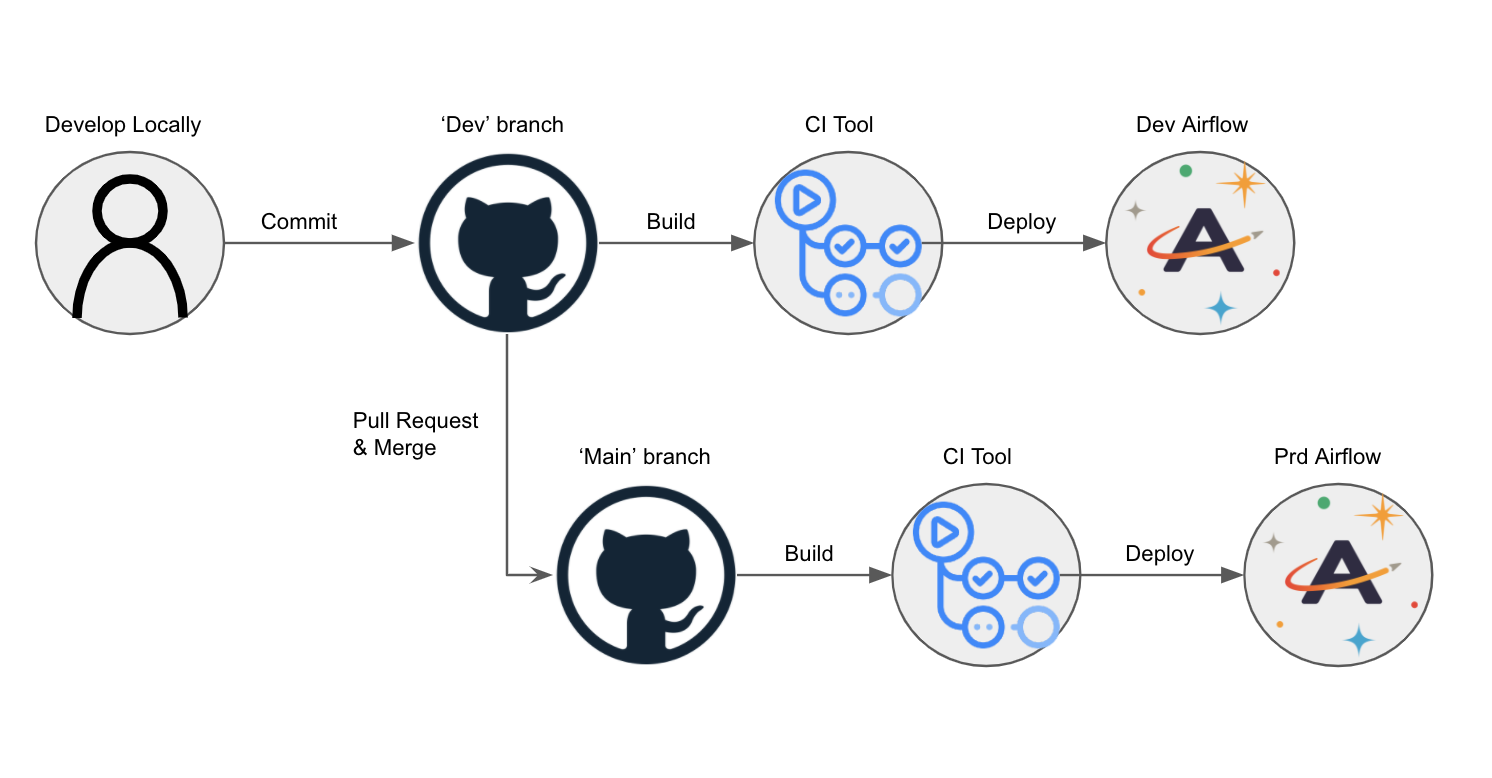
Consider an Astro project hosted on GitHub and deployed to Astro Private Cloud. In this scenario, dev and main branches of an Astro project are hosted on a single GitHub repository, and dev and prod Airflow Deployments are hosted on an Astronomer Workspace.

Using CI/CD, you can automatically deploy Dags to your Airflow Deployment by pushing or merging code to a corresponding branch in GitHub. The general setup:

  1. Create two Airflow Deployments within your Astronomer Workspace, one for dev and one for prod.
  2. Create a repository in GitHub that hosts project code for all Airflow Deployments within your Astronomer Workspace.
  3. In your GitHub code repository, create a dev branch off of your main branch.
  4. Configure your CI/CD tool to deploy to your dev Airflow Deployment whenever you push to your dev branch, and to deploy to your prod Airflow Deployment whenever you merge your dev branch into main.

That would look something like this:

CI/CD Workflow Diagram

Service account authentication

Service accounts provide secure, non-interactive authentication for CI/CD pipelines without requiring user credentials.

Prerequisites

Before completing this setup, ensure you:

  • Have access to a running Astro Deployment.
  • Installed the Astro CLI.
  • Are familiar with your CI/CD tool of choice.

Create a service account

To authenticate your CI/CD pipeline to the Astronomer private Docker registry, create a service account and grant it an appropriate set of permissions. You can do so using the Astro Private Cloud UI or CLI. After creation, you can delete this service account at any time. In both cases, creating a service account generates an API key for the CI/CD process.

You can create service accounts at the:

  • Workspace level: Allows you to deploy to multiple Airflow Deployments with one code push.
  • Deployment level: Ensures that your CI/CD pipeline only deploys to one particular Deployment.

Create a service account using the CLI

Deployment level service account:

First, get your Deployment ID:

$astro deployment list

This outputs the list of running Deployments you have access to and their corresponding UUIDs.

With that UUID, run:

$astro deployment service-account create -d <deployment-id> --label <service-account-label> --role <deployment-role>

Workspace level service account:

First, get your Workspace ID:

$astro workspace list

Then create the service account:

$astro workspace service-account create -w <workspace-id> --label <service-account-label> --role <workspace-role>

Create a service account using the API

You can also create a service account using the GraphQL API. The deploymentUuid field is the same Deployment ID (UUID) returned by astro deployment list.

1mutation {
2 createDeploymentServiceAccount(
3 deploymentUuid: "<deployment-id>"
4 label: "CI/CD Pipeline"
5 role: DEPLOYMENT_ADMIN
6 ) {
7 id
8 apiKey
9 }
10}

Set in CI/CD environment:

$export ASTRONOMER_KEY_ID=<service-account-id>
$export ASTRONOMER_KEY_SECRET=<api-key>

Create a service account using the Astro Private Cloud UI

If you prefer to provision a service account through the Astro Private Cloud UI:

  1. Log into Astronomer and navigate to: Deployment > Service Accounts
  2. Configure your service account:
    • Give it a Name
    • Give it a Category (optional)
    • Grant it a User Role (must be “Editor” or “Admin” to deploy code)
  3. Copy the API key that is generated
The API key is only visible during the session. Store it securely in an environment variable or secret management tool.
For more information on Workspace roles, see “Roles and Permissions”.

Set credentials in CI/CD environment

After creating a service account, set the credentials in your CI/CD environment:

$export ASTRONOMER_KEY_ID=<service-account-id>
$export ASTRONOMER_KEY_SECRET=<api-key>

The Astro CLI automatically uses these environment variables for authentication.

Best practices

  • Use service accounts for CI/CD authentication instead of personal credentials.
  • Store credentials securely in CI/CD secrets or environment variables.
  • Deploy only committed code in CI/CD pipelines to ensure reproducibility. Avoid using --force unless you have a specific reason to bypass the git commit check.
  • Add deployment descriptions with --description for audit trail and version tracking.
  • Test in staging before production Deployment to catch issues early. For guidance on writing Dags that work across environments, see Manage Airflow code and Dag writing best practices.
  • Use Dag-only deploys when you only need to update Dag files without rebuilding images.

Advanced: Docker registry deployment

For advanced use cases, legacy systems, or when you need more control over the Docker build and push process, you can deploy directly to the Astronomer Docker registry. Most users should use the CLI deployment method instead.

When to use Docker registry deployment:

  • You need custom Docker build processes or multi-stage builds.
  • You’re integrating with existing Docker-based CI/CD workflows.
  • You require fine-grained control over image tagging and versioning.
  • You’re working with legacy CI/CD systems that don’t support the Astro CLI.
If you’re using BuildKit with the Buildx plugin, you need to add the --provenance=false flag to your docker buildx build commands.
The Docker registry examples use RELEASE_NAME (for example, infrared-photon-7780) instead of DEPLOYMENT_ID. Both refer to your Astro Deployment, but the Astro CLI uses DEPLOYMENT_ID while the Docker registry approach uses the release name.

Authenticate and push to Docker

The first step of this pipeline authenticates against the Docker registry that stores an individual Docker image for every code push or configuration change:

$docker login registry.${BASE_DOMAIN} -u _ -p $${API_KEY_SECRET}

In this example:

  • BASE_DOMAIN = The domain at which your Astro Private Cloud instance is running
  • API_KEY_SECRET = The API key that you got from the CLI or the UI and stored in your secret manager

Build and push an image

After you are authenticated, you can build, tag, and push your Airflow image to the private registry, where a webhook triggers an update to your Astro Deployment.

To deploy successfully to Astro Private Cloud, the version in the FROM statement of your project’s Dockerfile must be the same as or newer than the Runtime version of your Astro Deployment. For more information on upgrading, see Upgrade Airflow.

Image naming components:

  • Registry Address: Tells Docker where to push images. On Astro Private Cloud, your private registry is located at registry.${BASE_DOMAIN}.
  • Release Name: The release name of your Astro Deployment, following the pattern spaceyword-spaceyword-4digits (for example, infrared-photon-7780).
  • Tag Name: Each deploy generates a Docker image with a corresponding tag. If you deploy via the CLI, the tag defaults to deploy-n, with n representing the number of deploys. For CI/CD, customize this tag to include the source and build number.

Example with custom tag:

$docker build -t registry.${BASE_DOMAIN}/${RELEASE_NAME}/airflow:ci-${BUILD_NUMBER} .

Run unit tests

For CI/CD pipelines that push code to a production Deployment, Astronomer recommends adding a unit test after the image build step to ensure that you don’t push a Docker image with breaking changes. To run a basic unit test, add a step in your CI/CD pipeline that executes docker run and then runs pytest tests in a container based on your newly built image before it’s pushed to your registry. For guidance on writing pytest tests for Airflow, including Dag validation tests and unit tests for custom operators, see Test Airflow Dags.

For example, you can add the following command as a step in your CI/CD pipeline:

BASE_DOMAIN, RELEASE_NAME, and BUILD_NUMBER should be set as environment variables in your CI/CD tool.
$docker run --rm registry.${BASE_DOMAIN}/${RELEASE_NAME}/airflow:ci-${BUILD_NUMBER} /bin/bash -c "pytest tests"

Configure your CI/CD pipeline

Depending on your CI/CD tool, configuration varies slightly. This section focuses on outlining what needs to be accomplished, not the specifics of how.

At its core, your CI/CD pipeline first authenticates to the Astronomer private registry, then builds, tags, and pushes your Docker image to that registry.

Docker registry example: GitHub Actions

This example shows how to implement CI/CD using GitHub Actions with Docker registry deployment for both development and production environments.

Setup steps:

  1. Create a GitHub repository for your Astro project with dev and main branches.

  2. Create two Deployment-level service accounts: one for Dev and one for Production.

  3. Add service accounts as GitHub secrets named SERVICE_ACCOUNT_KEY and SERVICE_ACCOUNT_KEY_DEV.

  4. Create a GitHub Action with the following workflow:

    1name: Astronomer CI - Deploy code
    2on:
    3 push:
    4 branches: [dev]
    5 pull_request:
    6 types:
    7 - closed
    8 branches: [main]
    9jobs:
    10 dev-push:
    11 if: github.ref == 'refs/heads/dev'
    12 runs-on: ubuntu-latest
    13 steps:
    14 - name: Check out the repo
    15 uses: actions/checkout@v3
    16 - name: Log in to registry
    17 uses: docker/login-action@v1
    18 with:
    19 registry: registry.${BASE_DOMAIN}
    20 username: _
    21 password: ${{ secrets.SERVICE_ACCOUNT_KEY_DEV }}
    22 - name: Build image
    23 run: docker build -t registry.${BASE_DOMAIN}/<dev-release-name>/airflow:ci-${{ github.sha }} .
    24 - name: Run tests
    25 run: docker run --rm registry.${BASE_DOMAIN}/<dev-release-name>/airflow:ci-${{ github.sha }} /bin/bash -c "pytest tests"
    26 - name: Push image
    27 run: docker push registry.${BASE_DOMAIN}/<dev-release-name>/airflow:ci-${{ github.sha }}
    28 prod-push:
    29 if: github.event.action == 'closed' && github.event.pull_request.merged == true
    30 runs-on: ubuntu-latest
    31 steps:
    32 - name: Check out the repo
    33 uses: actions/checkout@v3
    34 - name: Log in to registry
    35 uses: docker/login-action@v1
    36 with:
    37 registry: registry.${BASE_DOMAIN}
    38 username: _
    39 password: ${{ secrets.SERVICE_ACCOUNT_KEY }}
    40 - name: Build image
    41 run: docker build -t registry.${BASE_DOMAIN}/<prod-release-name>/airflow:ci-${{ github.sha }} .
    42 - name: Run tests
    43 run: docker run --rm registry.${BASE_DOMAIN}/<prod-release-name>/airflow:ci-${{ github.sha }} /bin/bash -c "pytest tests"
    44 - name: Push image
    45 run: docker push registry.${BASE_DOMAIN}/<prod-release-name>/airflow:ci-${{ github.sha }}

Replace <dev-release-name> and <prod-release-name> with your Deployment release names.

  1. Test the workflow by committing changes to dev to update your development Deployment, then merge dev into main via pull request to update production.

The prod-push action only runs after merging a pull request. To further restrict this pipeline, add branch protection settings in GitHub to prevent direct pushes to main.

Additional Docker registry examples

The following sections provide templates for configuring CI/CD pipelines using popular CI/CD tools with Docker registry deployment. Each template can be customized to manage multiple branches or Deployments based on your needs.

DroneCI

1pipeline:
2 build:
3 image: quay.io/astronomer/ap-build:latest
4 commands:
5 - docker build -t registry.$BASE_DOMAIN/$RELEASE_NAME/airflow:ci-${DRONE_BUILD_NUMBER} .
6 volumes:
7 - /var/run/docker.sock:/var/run/docker.sock
8 when:
9 event: push
10 branch: [ master, release-* ]
11
12 test:
13 image: quay.io/astronomer/ap-build:latest
14 commands:
15 - docker run --rm registry.$BASE_DOMAIN/$RELEASE_NAME/airflow:ci-${DRONE_BUILD_NUMBER} /bin/bash -c "pytest tests"
16 volumes:
17 - /var/run/docker.sock:/var/run/docker.sock
18 when:
19 event: push
20 branch: [ master, release-* ]
21
22 push:
23 image: quay.io/astronomer/ap-build:latest
24 commands:
25 - echo $${SERVICE_ACCOUNT_KEY}
26 - docker login registry.$BASE_DOMAIN -u _ -p $SERVICE_ACCOUNT_KEY
27 - docker push registry.$BASE_DOMAIN/$RELEASE_NAME/airflow:ci-${DRONE_BUILD_NUMBER}
28 secrets: [ SERVICE_ACCOUNT_KEY ]
29 volumes:
30 - /var/run/docker.sock:/var/run/docker.sock
31 when:
32 event: push
33 branch: [ master, release-* ]

CircleCI

1# Python CircleCI configuration file
2#
3# Check https://circleci.com/docs/language-python/ for more details
4#
5version: 2
6jobs:
7 build:
8 machine: ubuntu-2204:202509-01
9 steps:
10 - checkout
11 - restore_cache:
12 keys:
13 - v1-dependencies-{{ checksum "requirements.txt" }}
14 # fallback to using the latest cache if no exact match is found
15 - v1-dependencies-
16 - run:
17 name: Install test deps
18 command: |
19 # Use a virtual env to encapsulate everything in one folder for
20 # caching. And make sure it lives outside the checkout, so that any
21 # style checkers don't run on all the installed modules
22 python -m venv ~/.venv
23 . ~/.venv/bin/activate
24 pip install -r requirements.txt
25 - save_cache:
26 paths:
27 - ~/.venv
28 key: v1-dependencies-{{ checksum "requirements.txt" }}
29 - run:
30 name: run linter
31 command: |
32 . ~/.venv/bin/activate
33 pycodestyle .
34 deploy:
35 docker:
36 - image: docker:latest
37 steps:
38 - checkout
39 - setup_remote_docker:
40 docker_layer_caching: true
41 - run:
42 name: Push to Docker Hub
43 command: |
44 TAG=0.1.$CIRCLE_BUILD_NUM
45 docker build -t registry.$BASE_DOMAIN/$RELEASE_NAME/airflow:ci-$TAG .
46 docker run --rm registry.$BASE_DOMAIN/$RELEASE_NAME/airflow:ci-$TAG /bin/bash -c "pytest tests"
47 docker login registry.$BASE_DOMAIN -u _ -p $SERVICE_ACCOUNT_KEY
48 docker push registry.$BASE_DOMAIN/$RELEASE_NAME/airflow:ci-$TAG
49
50workflows:
51 version: 2
52 build-deploy:
53 jobs:
54 - build
55 - deploy:
56 requires:
57 - build
58 filters:
59 branches:
60 only:
61 - master

Jenkins

1pipeline {
2 agent any
3 stages {
4 stage('Deploy to astronomer') {
5 when { branch 'master' }
6 steps {
7 script {
8 sh 'docker build -t registry.$BASE_DOMAIN/$RELEASE_NAME/airflow:ci-${BUILD_NUMBER} .'
9 sh 'docker run --rm registry.$BASE_DOMAIN/$RELEASE_NAME/airflow:ci-${BUILD_NUMBER} /bin/bash -c "pytest tests"'
10 sh 'docker login registry.$BASE_DOMAIN -u _ -p $SERVICE_ACCOUNT_KEY'
11 sh 'docker push registry.$BASE_DOMAIN/$RELEASE_NAME/airflow:ci-${BUILD_NUMBER}'
12 }
13 }
14 }
15 }
16 post {
17 always {
18 cleanWs()
19 }
20 }
21}

Bitbucket

If you are using Bitbucket, this script should work (courtesy of our friends at Das42)

1image: quay.io/astronomer/ap-build:latest
2
3pipelines:
4 branches:
5 master:
6 - step:
7 name: Deploy to production
8 deployment: production
9 script:
10 - echo ${SERVICE_ACCOUNT_KEY}
11 - docker build -t registry.$BASE_DOMAIN/$RELEASE_NAME/airflow:ci-${BITBUCKET_BUILD_NUMBER} .
12 - docker run --rm registry.$BASE_DOMAIN/$RELEASE_NAME/airflow:ci-${BITBUCKET_BUILD_NUMBER} /bin/bash -c "pytest tests"
13 - docker login registry.$BASE_DOMAIN -u _ -p $SERVICE_ACCOUNT_KEY
14 - docker push registry.$BASE_DOMAIN/$RELEASE_NAME/airflow:ci-${BITBUCKET_BUILD_NUMBER}
15 services:
16 - docker
17 caches:
18 - docker

GitLab

1astro_deploy:
2 stage: deploy
3 image: docker:latest
4 services:
5 - docker:dind
6 script:
7 - echo "Building container.."
8 - docker build -t registry.$BASE_DOMAIN/$RELEASE_NAME/airflow:CI-$CI_PIPELINE_IID .
9 - docker run --rm registry.$BASE_DOMAIN/$RELEASE_NAME/airflow:CI-$CI_PIPELINE_IID /bin/bash -c "pytest tests"
10 - docker login registry.$BASE_DOMAIN -u _ -p $SERVICE_ACCOUNT_KEY
11 - docker push registry.$BASE_DOMAIN/$RELEASE_NAME/airflow:CI-$CI_PIPELINE_IID
12 only:
13 - master

AWS CodeBuild

1version: 0.2
2phases:
3 install:
4 runtime-versions:
5 python: latest
6
7 pre_build:
8 commands:
9 - echo Logging in to dockerhub ...
10 - docker login "registry.$BASE_DOMAIN" -u _ -p "$API_KEY_SECRET"
11 - export GIT_VERSION="$(git rev-parse --short HEAD)"
12 - echo "GIT_VERSION = $GIT_VERSION"
13 - pip install -r requirements.txt
14
15 build:
16 commands:
17 - docker build -t "registry.$BASE_DOMAIN/$RELEASE_NAME/airflow:ci-$GIT_VERSION" .
18 - docker run --rm "registry.$BASE_DOMAIN/$RELEASE_NAME/airflow:ci-$GIT_VERSION" /bin/bash -c "pytest tests"
19 - docker push "registry.$BASE_DOMAIN/$RELEASE_NAME/airflow:ci-$GIT_VERSION"

Azure DevOps

This example shows how to automatically deploy your Astro project from a GitHub repository using an Azure DevOps pipeline.

To see an example GitHub project that uses this configuration, see cs-tutorial-azuredevops on GitHub.

Prerequisites:

  • A GitHub repository hosting your Astro project.
  • An Azure DevOps account with permissions to create new pipelines.

Setup steps:

  1. Create a file called astro-devops-cicd.yaml in your Astro project repository:

    1# Control which branches have CI triggers:
    2trigger:
    3- main
    4
    5# To trigger the build/deploy only after a PR has been merged:
    6pr: none
    7
    8# Optionally use Variable Groups & Azure Key Vault:
    9#variables:
    10#- group: Variable-Group
    11#- group: Key-Vault-Group
    12
    13stages:
    14- stage: build
    15 jobs:
    16 - job: run_build
    17 pool:
    18 vmImage: 'Ubuntu-latest'
    19 steps:
    20 - script: |
    21 echo "Building container.."
    22 docker build -t registry.$(BASE-DOMAIN)/$(RELEASE-NAME)/airflow:$(Build.SourceVersion) .
    23 docker run --rm registry.$(BASE-DOMAIN)/$(RELEASE-NAME)/airflow:$(Build.SourceVersion) /bin/bash -c "pytest tests"
    24 docker login registry.$(BASE-DOMAIN) -u _ -p $(SVC-ACCT-KEY)
    25 docker push registry.$(BASE-DOMAIN)/$(RELEASE-NAME)/airflow:$(Build.SourceVersion)
  2. Follow the steps in Azure documentation to link your GitHub repository to an Azure pipeline. When prompted for the source code for your pipeline, specify that you have an existing Azure Pipelines YAML file and provide the file path: astro-devops-cicd.yaml.

  3. Finish and save your Azure pipeline setup.

  4. In Azure, add environment variables for the following values:

    • BASE-DOMAIN: Your base domain for Astro Private Cloud
    • RELEASE-NAME: The release name for your Deployment
    • SVC-ACCT-KEY: The service account key you created for CI/CD (mark as secret)

After completing this setup, any merges to the main branch of your GitHub repository trigger the pipeline and deploy your changes to Astro Private Cloud.