
Set up authentication and single sign-on for Astro
Set up authentication and single sign-on for Astro

Set up authentication and single sign-on for Astro
This guide provides the steps for integrating identity providers on Astro to enable Single Sign-On (SSO) for your users. After you complete the integration for your organization:
To manage Organization users after you have configured SSO, see Manage Organization users.
In addition to SSO, users can authenticate to Astro in three ways:
To require users to sign in through your IdP and disable the other methods, see SSO enforcement.
Single sign-on (SSO) allows users to sign in using their company credentials, managed through an IdP. This provides a streamlined login experience for your Astro users, as they are able to use the same credentials across multiple applications. In addition, this provides improved security and control for organizations to manage access from a single source. Astro supports integrations with the following IdPs:
At a high level, to configure an SSO identity provider (IdP) you will:
This section provides setup steps for setting up Okta as your IdP on Astro. After completing this setup, all users in your organization can use Okta to sign in to Astro.
The Astro integration with Okta supports the following authentication options:
To set up Okta as your IdP, you will create a Security Assertion Markup Language (SAML) connection to Okta.
In the Astro UI, click Organization Settings, then click Authentication.
In the SSO Configuration menu, click Configure SSO.
Configure the following values for your connection:
Copy the Connection Name.
Open a new tab and go to Okta. In the Okta Admin Console, go to Applications and click Browse App Catalogue. Then, search the catalogue, select the Astro app integration, and click Add Integration. After configuring a label for the integration, the application appears in Applications.
When you create your application, Okta automatically maps the following attributes to Astro user account values:
Open the Astro application you just configured, click Sign On, then click Edit. Configure the following values:
Create and update.Copy the values for Sign-on URL, Sign out URL, and X.509 Certificate from the Metadata Details section.
Assign yourself to the Astro app integration from Okta. See Assign an app integration to a user.
Return to the Astro UI. In the configuration screen for your SAML connection, configure the following values:
Click Create. Your Okta integration appears as an entry in SSO Configuration.
In SSO Configuration, click Activate. You are redirected to Okta to test your configuration. After you have successfully authenticated, you are redirected to Astro.
Click Activate SSO.
An SSO bypass link allows you to authenticate to your Organization without using SSO. This link should be used to access your Organization only when you can’t access Astro due to an issue with your identity provider.
If you don’t want to maintain an SSO bypass link, click Delete. You can always regenerate a link if you need one in the future.
On the page for your Okta app integration, open the Assignments tab. Ensure that all users who will use Astro are assigned to the integration. For more information, see Assign applications to users.
SCIM provisioning allows you to manage Astro users from your identity provider platform. See Set up SCIM provisioning for setup steps.
Configuring an SSO connection lets your users sign in through your IdP, but doesn’t require them to. By default, users in your verified domains can still sign in with basic authentication, Google, or GitHub. To require them to sign in through your IdP, enforce SSO.
Enforcement:
Astro doesn’t provide native MFA for basic or social logins. To require MFA for all users, enforce SSO on a Business plan or higher and configure MFA in your IdP — for example, with Okta Adaptive Authentication or Microsoft Conditional Access.
To enforce SSO:
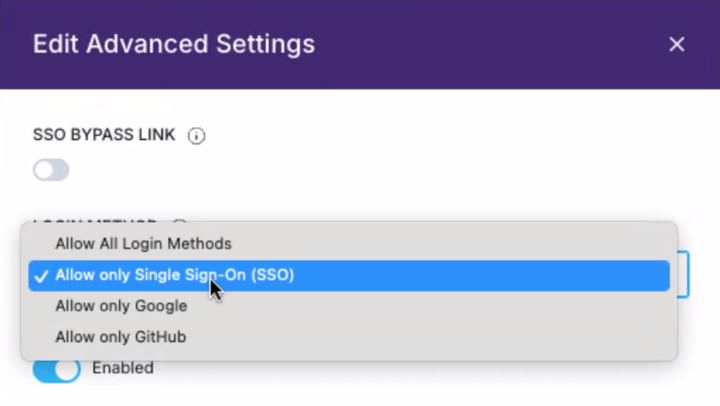
You can also restrict sign-in to only Google or only GitHub from the same list.
If your organization needs to switch from one SSO identity provider to another, you can remove the existing SSO connection and configure a new one. This process requires a brief period of downtime during which users can’t sign in through the old IdP.
Before you remove the old SSO connection, complete the initial registration step for your new IdP. This ensures that your new IdP is ready to connect to Astro as soon as the old SSO connection is removed.
Follow the instructions in the relevant tab under Configure your SSO identity provider and complete only the first step for your new IdP. For example, if you’re switching to Microsoft Entra ID, complete the Register Astro as an application on Azure step.
After you delete the old connection, users can only sign in through an SSO bypass link or other enabled authentication methods until you activate the new SSO connection.
Return to the instructions for your new IdP under Configure your SSO identity provider and complete the remaining steps, starting from the step where you configure SSO on Astro.
Astro supports just-in-time provisioning by default for all single sign-on (SSO) integrations. This means that if someone without an Astro account tries logging into Astro with an email address from a domain that you manage, they are automatically granted a default role in your Organization without needing an invite. Users with emails outside of this domain need to be invited to your Organization to access it.
To enable or disable just-in-time provisioning:
In the Astro UI, click Organization Settings, then click Authentication.
In the SSO Configuration menu, click the pencil icon to edit your SSO connection.
In Automatic Membership, select the default Organization role for users who sign in to Astro for the first time through your identity provider. To disable just-in-time provisioning, select Disabled.
Regenerating your SSO bypass link voids your existing SSO bypass link so that any former users with the existing link can’t sign in to Astro.
In the Astro UI, click the Settings tab.
Click Regenerate to create a new bypass link and void the old one.